Several years ago I invested in a fair number of Tumbling Dice 1:2400 ships with the aim of moving into some ACW naval gaming. They are nice little ships that come at a great price - but lacked the detail I wanted. In the end, they found a new home via Ebay.
Now, I find myself on the brink of a new era of ACW naval gaming thanks to John Churchill, 1st Duke of Marlborough! 'What the ...?', I hear you say. Thanks for asking, let me explain! :)
My first grand venture into 6mm was with a pair of the excellent War of Spanish Succession starter armies from Baccus. They were great little guys and I really enjoyed painting up my Anglo-Dutch and Franco-Bavarian armies. However, as so often happens with me, I have all the energy in the world with a new project right up to the point of gaming with the freshly painted armies. They sat for a couple of years and I recently decided to sell them to finance new projects.
Well, there was great interest on Ebay, but none more determined than a gentlemanly request from the east coast of the US asking if I would consider shipping these guys half way around the world (I'd said no international shipping in my listing). The short version of events is that I quickly warmed to this buyer in the US and happily offered to ship them if he won. He did, and I'm glad. The tale is eloquently told elsewhere, but let me just say that I can thank the Duke of Marlborough - or at least my new mate Rob's interest in the fine gent - for linking me up with a great new wargaming pal across the pond (the very big one to the east).
I quickly discovered that Rob was a decent and very generous guy, and hearing I was pining for some riverine ironclad biffo, he took pity on this penniless Antipodean and very kindly sent a care package from the most wonderful Langton 1:1200 ACW range (available from Waterloo Minis in the US).
In the weeks since, I've been agonising over painting techniques for these estuarine monsters and the various other gunboats included in my package from Rob. I make no claims of being any good at this style of painting as yet - for instance, sails somehow defeat me, despite many attempts. But, on the weekend I finished painting the ships to my initial level of satisfaction and based them in preparation for a trial run of David Manley's Iron and Fire rules for the Ironclad period (1850-1880).
I don't have any dedicated terrain for this scale of naval/riverine gaming, so I pulled together what I could with my usual naval gaming cloth (yes, the blue tablecloth from my buddy Elaine!) and some pieces of a cut up terrain mat. A few pictures follow.
Confederate ironclads sortie out from a river to intercept some of the Union blockading fleet that ventured too close.
The CSS Merrimack (ACW1) and CSS Richmond (ACW9) steam out to intercept the Federals.
Elements of the the Federal blockading fleet - (L to R) a captured Confederate Commerce Raider (ACW25), USS Gen. Bragg (ACW53) and USS Cumberland (ACW2).
Langton 'Commercial Steamer (ACW25) rigged as a Confederate Commerce Raider
Langton USS Cumberland (ACW2) - needing some rigging, a challenge for another day!
Langton USS/CSS Gen. Bragg (ACW53).
Langton CSS Merrimack (ACW1)
Langton CSS Richmond Class ironclad (ACW9)
Not pictured here were the twin turreted monitor USS Onondaga (ACW29) and USS New Ironsides (ACW42) that was also included. Thanks Rob, I love them! I can't wait to get out and start hammering' some iron!
The First Balkan War (October 1912 to May 1913) saw the Balkan League (Bulgaria, Serbia, Greece and Montenegro) go to war against the fading Ottoman Empire. Ultimately, the Balkan League defeated the Ottoman armies capturing almost all of the Empire's remaining European territory.
The Bulgarian attack at Çatalca (near Istanbul) .
On the outbreak of war, the Hellenic Navy moved quickly to secure the island of Lemnos for its strategic importance as an anchorage close to the Dardanelles Straits. The Ottoman navy had not ventured out of the Black Sea (focussing on operations against the Bulgarian Navy), despite its superiority over the Greeks in speed and broadside weight. The broadside weight of a ship is '... a measurement of a vessel's maximum simultaneous firepower which can be delivered upon a single target.' (source)
However, after leaving the Hellenic Navy with two months to consolidate it's hold on the Aegean, on 16 December, 1912, the Ottoman Navy sortied out from the Dardanelles and sparked the largest sea battle of the war.
Ottoman Navy, Cpt Ramiz Bey
2 battleships (Barbaros Hayreddin and Turgut Reis), these were Brandenburg-class battleships purchased from the Imperial German Navy in 1910.
2 old battleships (Mesudiye and Âsâr-ı Tevfik)
1 protected cruiser (Mecidiye)
4 destroyers (Muavenet-i Milliye, Yadigâr-i Millet, Taşoz and Basra)
Hellenic Navy, Rear Adm Pavlos Kountouriotis
1 armoured cruiser (Georgios Averof)
3 coastal defence battleships (Hydra, Spetsai and Psara)
4 destroyers (Aetos, Ierax, Panthir and Leon)
The Battle
The Ottoman fleet sortied from the Dardanelles at 9:30; the smaller craft remained at the mouth of the straits while the battleships sailed north, hugging the coast.
The Royal Hellenic Navy, led by Rear Admiral Pavlos Kountouriotis on board the flagship Averof, defeated the Ottoman Navy, just outside the entrance to the Dardanelles (Hellespont).
During the battle, Kountouriotis, frustrated by the slow speed of the three older Greek battleships Hydra, Spetsai and Psara, hoisted the Flag Signal for the letter Z which stood for "Independent Action", and sailed forward alone at a speed of 20 knots, against the Ottoman fleet.
Taking full advantage in her superior speed, guns and armour, Averof succeeded in crossing the Ottoman fleet's "T" and concentrated her fire against the Ottoman flagship Barbaros Hayreddin, thus forcing the Ottoman fleet to retreat in disorder. The Greek fleet, including the destroyers Aetos, Ierax and Panthir continued to pursue the Ottoman fleet off-and-on between the dates of December 13 and December 26, 1912.
Gaming the Battle of Elli
1. The Fleets
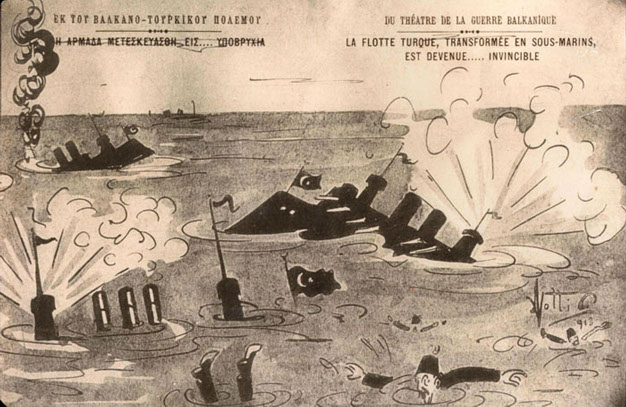
Postcard: Turkish warships before the Battle of Elli on December 5, 1912 upon leaving the Dardanelles
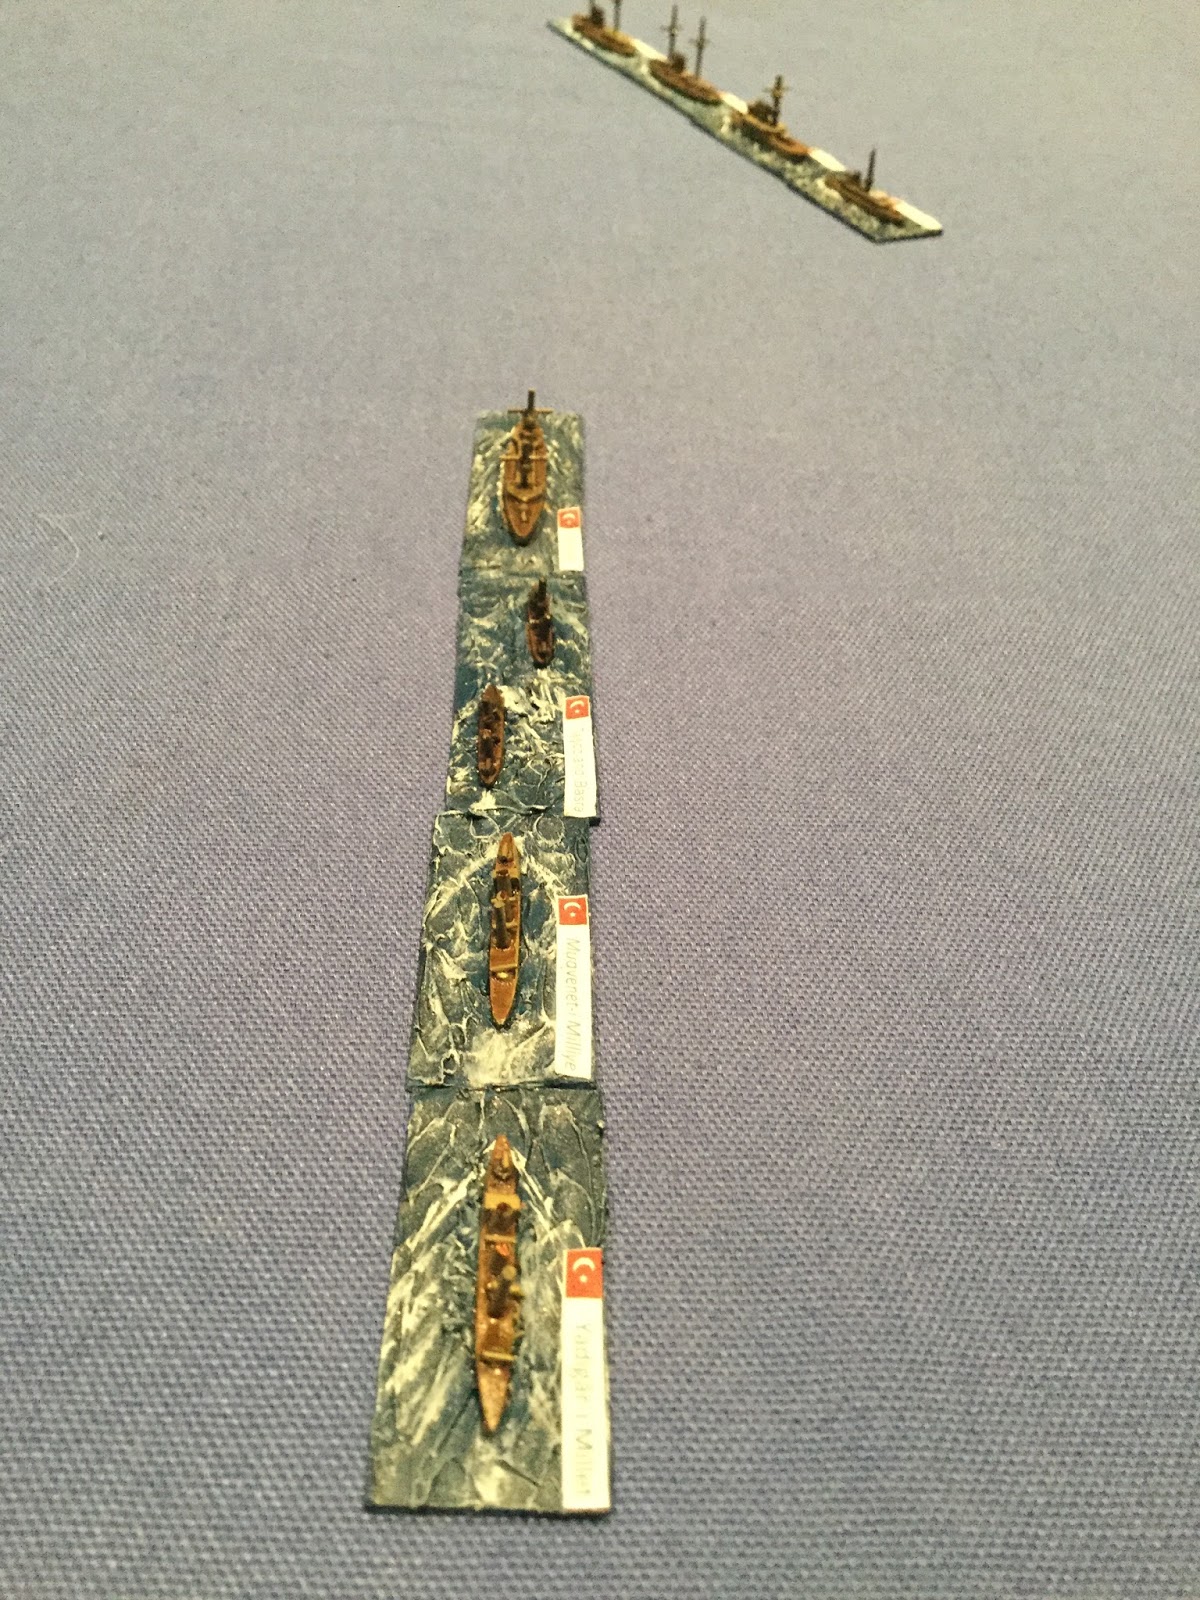
The Ottoman navy battleship division: Barbaros Hayreddin (flagship), Turgut Reis, Mesudiye and Âsâr-ı Tevfik.
The Ottoman destroyer division: The protected cruiser Mecidiye (flagship) and destroyers Muavenet-i Milliye, Yadigâr-i Millet, Taşoz and Basra (multi-ship base).
The Hellenic Navy: The armoured cruiser Georgios Averof (flagship), and coastal defence battleships Hydra,
Spetsai and Psara.
The Hellenic Destroyer Division: Aetos, Ierax, Panthir and Leon (foreground)
2. The Battle
The Ottoman Navy, under Cpt Ramiz Bey, steamed out of the Straits of the Dardanelles at 8am on 16 December 1912. The weather conditions were good and the sea was quiet.
Cpt Ramiz Bey orders the Barbaros Hayreddin and Turgut Reis to open fire on the Greek fleet after steaming out of the Dardanelles Strait. Some keen Ottoman gunnery in this opening round results in two hits on the Averoff.
Rear Adm Pavlos Kountouriotis orders the main battery of the Averoff to return fire on the Turgut Reis scoring a single hit in retaliation.
The Ottoman battleships close in on the Greeks with the 9.2" guns of the Mesudiye also searching for the Averoff.
Ottoman salvoes straddle the Averoff but another hit sees her reach 'damaged' status early in the engagement (giving the Ottomans the first victory points of the game). By this stage two checks for critical damages have been made on the Averoff seeing a loss of attack dice on all batteries and the for'ard torpedo tubes put out of action.
The Ottoman destroyer division (left centre) led by the protected cruiser Mecidiye move in to screen the battleships as the Greek destroyers (top right) start to pose a threat. The flag of the Greek destroyers - the Aetos (centre right) - turns its guns turn on the Mecidiye equally concerned about the possibility of the Ottoman destroyers getting in close to the Averoff and the slow moving Hydra, Spetsai and Psara.
Swinging in front of their battleships, the Ottoman destroyers (top centre) lay smoke giving the battleships time to slip away. The Greek destroyer division (bottom) - Aetos, Ierax, Panthir and Leon - open fire damaging the Mecidiye and Taşoz and Basra (multi-ship base) as they close on the Averoff (top right). Damage rolls result in two critical hits on the Mecidiye disabling her rudder and causing flooding.
The Greek battleship division - Averoff, Hydra and Spetsai - home in on the Mecidiye and under a fierce bombardment she breaks up and sinks. Psara scores a lucky hit on the Barbaros Hayreddin (centre left) as the Ottoman flagship emerges from behind the smoke screen.
In retaliation for the loss of the Mecidiye, all three batteries of the Barbaros Hayreddin (centre left) score hits on the Psara. The ageing ironclad was severely damaged resulting in a loss of firepower and a significant loss of speed.
At this stage of the engagement, the destroyer divisions began to dominate the action. The Hellenic Destroyers (bottom centre) engaged the Âsâr-ı Tevfik scoring multiple hits with their light guns with critical hits resulting in a loss of speed. Meanwhile, the remaining Ottoman destroyers launched torpedo attacks against the Hydra and Spetsai. The Averoff retaliated damaging the Yadigâr-i Millet, Taşoz and Basra.
Both the Ottoman and Hellenic destroyers turn into line abreast hoping to close on the capital ships to launch torpedo attacks. The Greek gunners continue to pound the Âsâr-ı Tevfik (left centre) which begins to fall behind the division. The Mesudiye returns fire with a deadly salvo sinking the Hellenic destroyer Ierax.
The Hellenic cruisers concentrate their fire on the Ottoman destroyers as they home in on the crippled Psara and sink her with torpedoes. The remaining Greek cruisers fire punishing salvos that sink the Muavenet-i Milliye.
As the battered destroyer divisions circle looking for any last kills with their remaining torpedoes (centre), the Ottoman (centre left) and Hellenic (bottom right) capital ships stay clear of the maelstrom for fear of torpedo attack.
Both commanders realise the battle hangs in the balance (both side are approaching their victory point target based on the ships already sunk and the damage to those still afloat) and order their destroyers to make one last effort to sink the capital ships of their enemy.
The remaining Ottoman destroyers steam into close quarters and launch the final torpedoes against the Hydra - which is subsequently sunk.
The Hellenic destroyers 'cross the T' of the Ottoman battleships to launch final torpedo attacks - the Âsâr-ı Tevfik having fallen out of command. The Ottoman battleships retaliate heavily.
In a final blow to the Ottomans, the guns of the Hellenic cruisers (top right) home in on the Barbaros Hayreddin (top left), sinking the Ottoman flagship in a last desperate attempt at victory before they slip away into the safety of the Dardanelles.
The heavy guns of the Ottoman battleships and the Hellenic cruisers pick off the remaining destroyers on each side, resulting in both sides exceeding the victory point tally required for victory.
This refight of the Battle of Elli has depleted both the Hellenic and Ottoman fleets with their relatively new destroyer divisions destroyed and several capital ships lost. Neither Ottoman or Greek can claim outright victory, both having inflicted serious damage on their opponents.
However, for the Ottoman Navy the loss of their flagship, Barbaros Hayreddin - now at the bottom of the Aegean along with the fleet commander Cpt Ramie Bey - will reduce the likelihood of any further sorties into the Aegean.
While the Hellenic Navy's flagship Georgios Averof is damaged, and their modern destroyer division is now but a memory, one can imagine Rear Admiral Pavlos Kountouriotis will be quick to re-assert Hellenic influence in the Aegean.
After driving the Turks out of Gaza, General Allenby continued to put pressure on the Turkish 7th Division in the hills to the north and north East. The hill villages were good defensive positions for the Turks, but Allenby was determined not to give them time to dig in and make them impregnable!
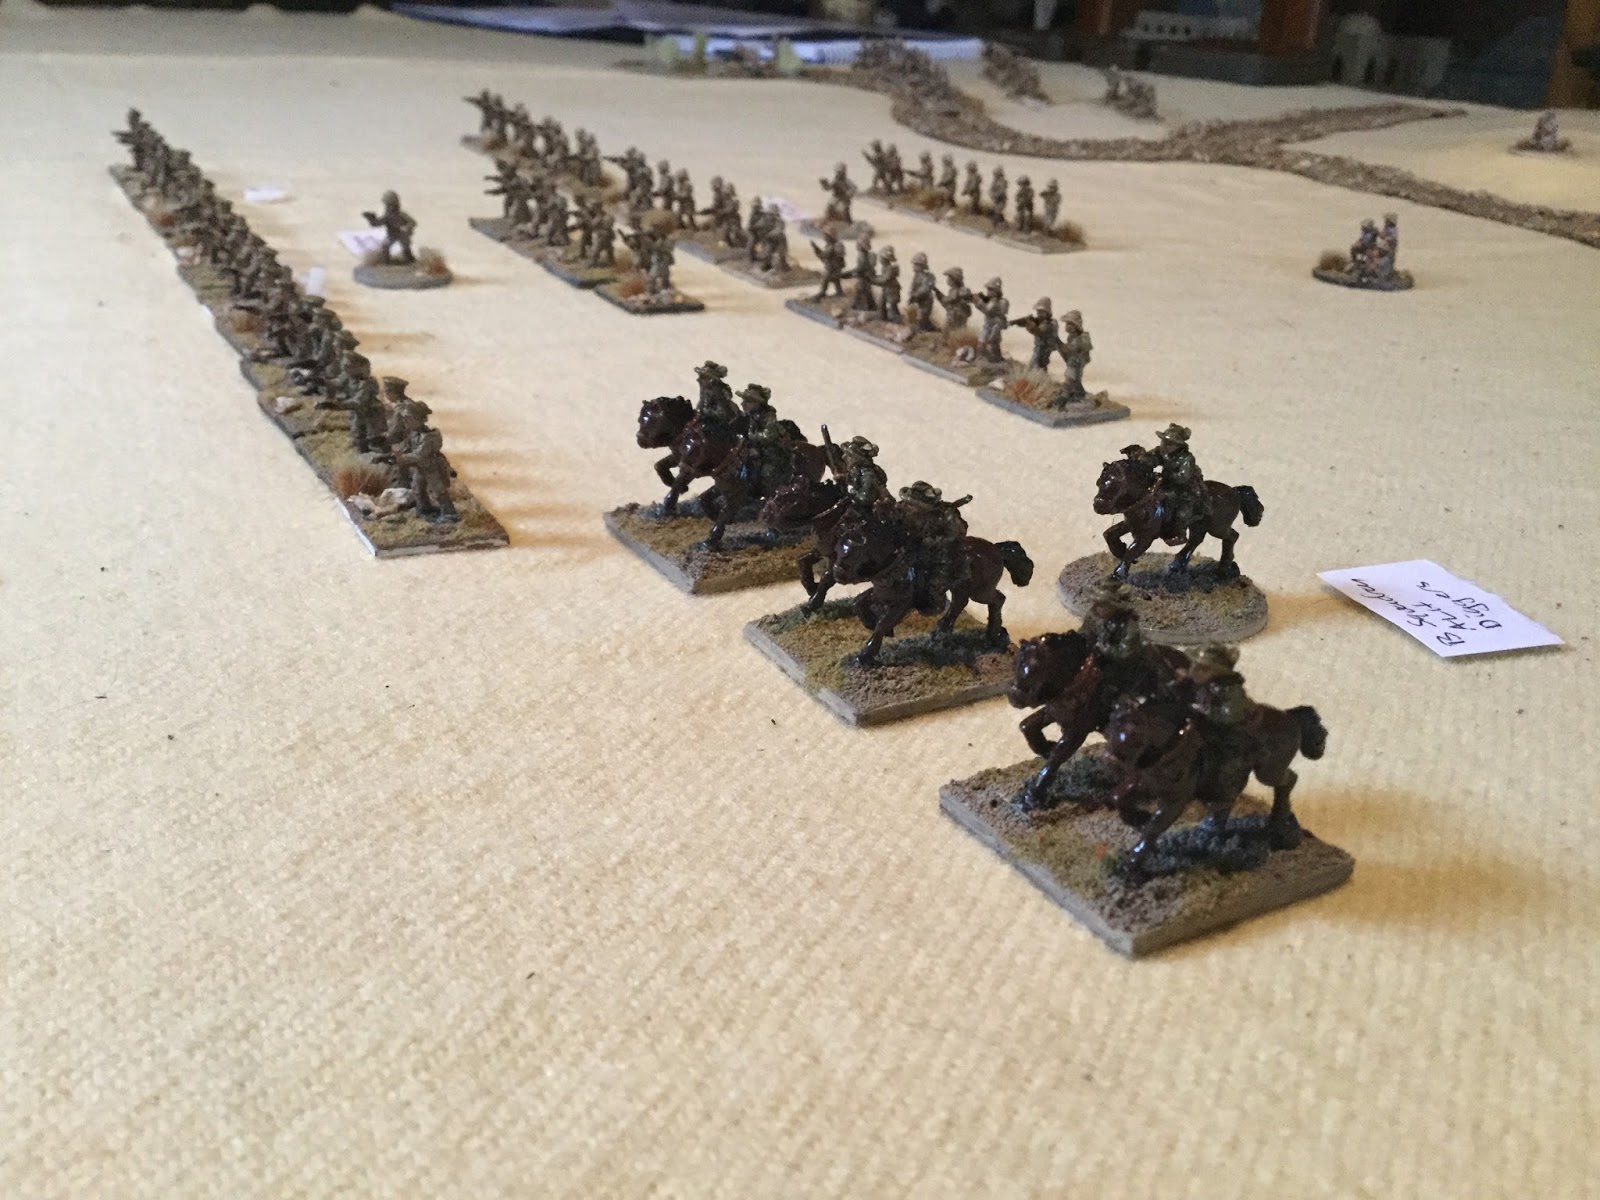
The 155th Brigade, holding the right flank of the 53rd Infantry Division, was ordered to advance with all haste. The Scots of the brigade had spent an uncomfortable night in Beshshit after the assault of the previous day. There was on;y one well and the Turks had partially destroyed it as they abandoned the position. Men and horses, alike, were thirsty. They had to push on for water.
Allenby had quickly reorganised the 155th brigade after it's successful assault of Beshshit the day before. They needed to push on to take the hill villages of El Mughar and Katrah -before the Turks had time to entrench. Anyway, both villages had better wells ... and the brigade needed water, and fast! In the last hour before dawn, the 155th moved down out of Beshshit to the edge of the Wadi Jamus - the line for where the assault would kick off.
The assault of the 155th Brigade begins in ernest. Kick off time is 05:00 with the first glint of dawn on the horizon.
... and on they marched in the first light of day!
Any element of surprise now lost, the pipers of the Royal Scottish Fusiliers rang out in the morning air despite the dry mouths all round!
A squadron of the Australian Light Horse galloped up to ensure a connection was maintained between the left flank of the 155th Brigade and the 5th Mounted Brigade to their left.
Turkish lancers sweep onto the plains hoping to neutralise the support being provided by the Australian Light Horse .
The British left found itself well in advance of the right flank due to delays caused by the broken ground of the Wadi Jamus. The order was given to press home the assault on El Mughar in the hope that the left flank would soon catch up.
British artillery registration was first rate during the initial assault. The town square of El Mughar screamed with HE and shrapnel that decimated the troops of the 20th Alay who were lining the cactus hedges.
Having scaled the slopes to El Mugha, the Royal Scots laid down heavy rifle fire against the remaining Turkish defenders.
After the initial lack of momentum for their assault, the ANZACs cornered the Turkish lancers behind El Mughar and put them to flight.
By mid morning, the British left closed on El Mughar despite scattered gun fire taking its toll.
The ANZAC mounted infantry swept around the walls of El Mughar, putting the Turkish cavalry to flight (and a flighty bunch of 'Damned Sodomites' they were!). Withering fire from the Royal Scots cleared the village square. A Bolus of the 20th Alay had already routed - would the remnants be able to hold out in the mud huts to the rear of the village?
The morning had seen a successful assault on El Mughar, now the 155th Brigade tuned its attention to the stalled right flank. As the signallers of brigade HQ established contact, the order to advance and assault Katrah galvanised the battalion commander into action.
As the assault turns to Katrah in early afternoon, the concentration of Turkish defenders started to take a toll on the advancing British infantry.
The musketry of the Royal Scots Fusiliers had cleared El Mughar but the troops had lost the impetus to make the final assault on the village.
As the brigade's assault reaches it's high water mark, Turkish and British artillery began to take a heavy toll in the centre.
Katarrh held out all day without looking like falling.The concentration of troops would certainly have suffered had more British artillery support been available.
British casualties were heavy.
The casualty count for the Turks was likewise heavy. Notable was the loss of two Alay commanders and the routing of a Tabur from the 20th Alay.
The final capture of El Mughar and the failure of the assault on Katrah suggests the game concluded with a draw. With reinforcements, the British would surely take Katrah the next day, if the Turks didn't slip away or reinforce their position overnight. Neither side can claim a strategic victory at this stage.
Mentioned in dispatches:
There were some units a that deserve special mention for gallantry and poltroonery.
The Pasha Bashers of the 2nd Tabur of the 20th Alay. The 20th Alay was decimated in the defence of El Mughar but the 2nd Tabur held out in the mud huts until the village was lost. In the face of an earnest assault by the Royal Scots Fusiliers they still managed to charge out behind a stone wall and wipe out an entire company of the attackers.
Was it poltroonery or was it incompetence? The elements of the 155th Brigade MG Company under Captain Harry Flashgun, never made it out of the marshland at the end of the Wadi Jamus beneath the British start line.
The 1/4 Kings Own Scottish Borderers deserve special mention and a smattering of VCs for their determined frontal assault on the hill village of Katrah. Having reached within 400 yards of the objective, the withering machine gun and rife fire from the 21st Alay halted their advance the battalion having suffered over 600 casualties.
The Turkish 21st Alay inflicted serious damage on the British right and centre throughout the second half of the assault. A special mention is deserved for the right flank of the Alay that was nearly wiped out on the south-western slopes of Katrah. They may have fallen like flies, but they took just as many with them.
Thanks for dropping by! I've been interested in model soldiers, board gaming, reenacting and miniatures wargaming for over 40 years. This blog is to share occasional gaming reports, my painting and scratch building attempts and to connect with gamers worldwide. I've had a range of interests over the years from ancients to modern and 2mm to 28mm.